


Adding Measurement Points
Add a measurement point to be output to the measurement recipe.


| Icon | Item | Action |
|---|---|---|
| Top | Scroll to the top of list. | |
| Previous | Scroll to the previous line. | |
| Next | Scroll to the next line. | |
| Bottom | Scroll to the bottom of list. | |
| Previous Bookmark | Scroll to previous Bookmark (shown only with bookmark). | |
| Next Bookmark | Scroll to next Bookmark (shown only with bookmark). |
| Menu | Action |
|---|---|
| Recipe Mode | Specify the format of the measurement recipe to be created. |
| Auto ROI Focus | Center screen on the the measurement point upon creation. |
| Next | Center screen on the next measurement point. |
| Prev | Center screen on the previous measurement point. |
| Load | Open the Load Measure Points dialog to load measurement points and append to the datalist. |
| Save | Open the Save Measure Points as dialog to save the measurement points in the datalist. |
| Clear All | Clear the datalist. |
| Float Panel | Float the panel. |
| Close Panel | Close the panel. |
| Icon | Item | Action |
|---|---|---|
 |
Direction | Switch to Add Measurement mode and specify the measurement direction. |
 |
Tone | Switch to Add Measurement mode and specify the target tone. |
 |
Search Width | Switch to Add Measurement mode and specify Search Width. |
 |
With Jog | Smoothen edge with jogs as a straight line. The value specified determines how far away the other lines should be from the original line to be considered for smoothing. |
| Jog Type | Switch to Add Measurement mode and specify the type of jog measurements. | |
 |
Assist Type | Ignore assist figures or space below the specified size when creating measurement line. |
 |
Measurements | Display the Measurement Panel menu. |
| Menu | Action |
|---|---|
| LS Detect | Open LS Detect dialog to search for line segments with the specified condition. |
| Jog Tolerance | Open Jog Tolerance dialog to enable jog tolerance and specify the jog tolerance amount. |
| Jog Type | Switch to Add Measurement mode and specify the type of jog measurements. |
| Assist Size | Open Assist Size dialog to enable ignore of assist line or space, and specify the size of the assist feature. |
| Direction | Switch to Add Measurement mode and specify the measurement direction. |
| Tone | Switch to Add Measurement mode and specify the target tone. |
| Search Width | Switch to Add Measurement mode and specify Search Width. |
| Save Image | Create and save image of each measurement point. |
| Icon | Item | Action |
|---|---|---|
| Icon | Left-click the icon of an item to display its Property. | |
 |
Lock | (Visible only on mouse hover) Lock the item so that it is not deleted when you clear the datalist. |
 |
Bookmark | (Visible only on mouse hover) Bookmark the item for easy cruising. |
The following badges are superimposed on the data list icon under certain conditions.
| Badge | Name | Description |
|---|---|---|
| Image Saved | Displayed if the image has already been saved with Save Image function. | |
 |
Target Error | Displayed when either or both the measured value/tone and the target value/tone specified in the file do not match. |
| Menu | Action |
|---|---|
| Add Root | Add Root that measurement points will belong to (this menu is displayed only if top-level element is specified). |
| Auto Rename | Automatically rename all items (this menu is displayed only if top-level element is specified). |
| Set as Current | Set the specified Root as the target for adding measurement points (this menu is displayed only if Root is specified). |
| Clear All | Clear the datalist (this menu is displayed only if top-level element or Root is specified). |
| Sort/By Coordinate | Sort measurement points by coordinates (this menu is displayed only if top-level element is specified). |
| Sort/By Display and Coordinate | Sort the currently displayed measurement points (this menu is displayed only if top-level element is specified). |
| Duplicate | Open the Duplicate Settings dialog for duplicating the specified item. |
| Create LS Detect Condition | Open the LS Detect dialog after creating search condition from the specified item. |
| LS Detect with Item/Search Around | Search the surrounding area based on the specified items, and execute LS Detect. Open the Search Size dialog to specify the search area size. |
| Pattern Match with Item/Search Around | Search the surrounding area based on the specified items, and execute Pattern Match. Open the Search Size dialog to specify the search area size. |
| Group/Create New Group | Group the specified item. If all cannot be grouped, the grouping is cancelled. |
| Group/Try Grouping | Group only items that can be grouped among the specified items. |
| Group/Try Grouping & Prune | Group only items that can be grouped and delete the rest. |
| Group/Ungroup | Ungroup the specified groups. |
| Shift | Open the Shift dialog to shift the specified item. |
| Jump | Center the screen to the specified item. |
| Start Auto Navigation | Start the auto-navigation from the specified item. Refer to Auto Navigation Bar page. |
| Select/Deselect | Reverse the select state of the specified item. |
| Show | Reverse the display state of the specified item on the screen. |
| Display/Name | Reverse the name display state of the specified item on the screen. |
| Display/Coordinates | Reverse the coordinates display state of the specified item on the screen. |
| Display/Length | Reverse the length display state of the specified item on the screen. |
| Display/X/Y Components | Reverse the delta length display state of the specified item on the screen. |
| Display/Angle | Reverse the angle display state of the specified item on the screen. |
| Color | Open a color specification dialog that changes the color of the specified item on the screen. |
| Lock | Reverse the lock state of the specified item. The locked items are not deleted when you clear the datalist. |
| Bookmark | Reverse the Bookmark state of the specified item. You can scroll only bookmarked items with dedicated buttons. |
| Move in Tree | Move the specified item in the datalist. |
| Expand | Expand the tree view of the specified item. |
| Collapse | Collapse the tree view of the specified item. |
| Expand All | Expand the tree view of all items. |
| Collapse All | Collapse the tree view of all items. |
| Properties | Open the File Properties dialog that displays the properties of the specified item. When both measurement points and groups are specified, only the properties for measurement points are displayed. |
| Delete | Delete the specified item. |
When measurements/alignment marks are created or edited, an unsaved indicator (*) appears in the panel title section.
If you try to exit neoEBV while the unsaved indicator is displayed, a dialog box to warn you that there is an unsaved change will appear.
The unsaved indicator will be cleared when the changed measurement is saved, cleared, or loaded.
If you do not need the confirmation for unsaved changes, you can turn it off from the preference.
See Confirm Data Save Status before Exit/Measurement in Preference Window/Data List page.
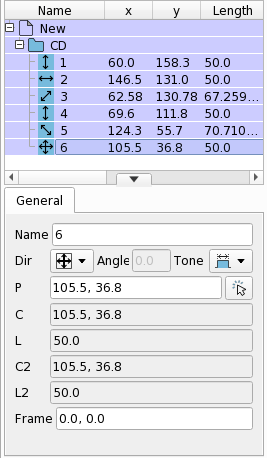
Add a measurement point to be output to the measurement recipe.
Duplicate a measurement point.
Moves the measurement point.
Group the created measurement points together.
Rename and sort the measurement points.
Create and save images of the measurement point.
Add an arbitrary column to Measurement Panel.
Search for figures that match the specified tone, width, height, and distance to neighboring figures, and create measurement point for each figure found.
Search for figures that match the extracted figure from the specified measurement point location, and create measurement point for each figure found.
Add the alignment marks to be output to the measurement recipe.